“You might have assumed I wrote this 1000+ characters of SQL by hand – but I did not… I’m going to show how you can generate most of this statement based on metadata that lives in your database already. This is only one example of what’s possible!”
Merging data is a common task that business intelligence developers deal with on a daily basis – but it’s also relevant to application developers (for example, when using materialized views). In fact, I go deep into an example of using materialized views in a different article – here. That’s important reading to lay the groundwork for this article, where I’ll show how we can streamline the process of building MERGE statements. (Writing code by hand is so 2017. 😊)
Probably unsurprisingly, I’m going to use XS Tool Suite to demonstrate one way to build a MERGE statement based on an example scenario I present on GitHub. To review the solution, I’ve created an event table:
CREATE TABLE [Source].[EventType] (
EventTypeID tinyint NOT NULL IDENTITY PRIMARY KEY,
EventTypeCode varchar(20) NOT NULL,
EventTypeDesc varchar(100) NOT NULL)
INSERT [Source].[EventType] (EventTypeCode, EventTypeDesc) VALUES ('ARRIVE', 'Widget Arrival');
INSERT [Source].[EventType] (EventTypeCode, EventTypeDesc) VALUES ('CAN_ARRIVE', 'Cancel Widget Arrival');
INSERT [Source].[EventType] (EventTypeCode, EventTypeDesc) VALUES ('LEAVE', 'Widget Depart');
INSERT [Source].[EventType] (EventTypeCode, EventTypeDesc) VALUES ('CAN_LEAVE', 'Cancel Widget Depart');
CREATE TABLE [Source].[Event] (
WidgetID int NOT NULL,
EventTypeID tinyint NOT NULL REFERENCES [Source].[EventType] (EventTypeID),
TripID int NOT NULL,
EventDate datetime NOT NULL,
PRIMARY KEY (WidgetID, EventTypeID, EventDate, TripID))
Our four event types represent when a theoretical widget arrives in our shop and departs; we can also cancel arrivals and departures (e.g. due to a mistake). We also support the possibility that a widget can arrive multiple times (i.e. “trips”). The event table is a complete history of a widget, but our business process might focus mostly on what widgets are currently present, in their most recent trip. To determine this, a query is necessary – and one that’s not exactly simple:
CREATE VIEW [Dest].[uv_WidgetLatestState]
AS
SELECT
lw.WidgetID
, la.LastTripID
, lw.LastEventDate
, la.ArrivalDate
, (SELECT MAX(de.EventDate)
FROM [Source].[Event] de
WHERE de.EventTypeID = 3
AND de.WidgetID = lw.WidgetID
AND de.TripID = la.LastTripID
AND NOT EXISTS
(SELECT 0
FROM [Source].[Event] dc
WHERE lw.WidgetID = dc.WidgetID
AND la.LastTripID = dc.TripID
AND dc.EventTypeID = 4
AND dc.EventDate > de.EventDate)) AS DepartureDate
FROM
(SELECT
e.WidgetID
, MAX(e.EventDate) AS LastEventDate
FROM
[Source].[Event] e
GROUP BY
e.WidgetID) lw
LEFT OUTER JOIN
(SELECT
ae.WidgetID
, ae.TripID AS LastTripID
, ae.EventDate AS ArrivalDate
FROM
[Source].[Event] ae
WHERE
ae.EventTypeID = 1
AND ae.EventDate =
(SELECT MAX(la.EventDate)
FROM [Source].[Event] la
WHERE la.EventTypeID = 1
AND la.WidgetID = ae.WidgetID
AND NOT EXISTS
(SELECT 0
FROM [Source].[Event] ac
WHERE la.WidgetID = ac.WidgetID
AND la.TripID = ac.TripID
AND ac.EventTypeID = 2
AND ac.EventDate > la.EventDate))) AS la ON lw.WidgetID = la.WidgetID
In this case, the query has been placed in a view, and using the view is easy enough – but not terribly efficient. In the other article, I note how if we persist the results of this view into a table (i.e. a materialized view), we can get a 20x performance benefit! The decision to do this is easy, but there are multiple ways to implement this. In the other article, I demonstrate how using a MERGE statement that detects for material changes and uses a control date offers a nice performance benefit, compared with trying to rebuild the table in its entirety.
Where I stop in the other article is explaining how I wrote the MERGE statement:
MERGE [Dest].[WidgetLatestState] AS a
USING (
SELECT
v.[WidgetID]
, v.[LastTripID]
, v.[LastEventDate]
, v.[ArrivalDate]
, v.[DepartureDate]
FROM
[Dest].[uv_WidgetLatestState] v
WHERE
v.LastEventDate > @lastprocessed
) AS T
ON
(
a.[WidgetID] = t.[WidgetID]
)
WHEN MATCHED
AND t.ArrivalDate IS NOT NULL
AND t.LastEventDate > @lastprocessed AND ((a.[LastTripID] <> CONVERT(int, t.[LastTripID]))
OR (a.[LastEventDate] <> CONVERT(datetime, t.[LastEventDate]))
OR (a.[ArrivalDate] <> CONVERT(datetime, t.[ArrivalDate]))
OR (a.[DepartureDate] <> CONVERT(datetime, t.[DepartureDate]) OR (a.[DepartureDate] IS NULL AND t.[DepartureDate] IS NOT NULL) OR (a.[DepartureDate] IS NOT NULL AND t.[DepartureDate] IS NULL))) THEN
UPDATE
SET LastTripID = t.LastTripID
, LastEventDate = t.LastEventDate
, ArrivalDate = t.ArrivalDate
, DepartureDate = t.DepartureDate
WHEN NOT MATCHED BY TARGET AND t.ArrivalDate IS NOT NULL THEN
INSERT (
WidgetID
, LastTripID
, LastEventDate
, ArrivalDate
, DepartureDate
) VALUES (
t.[WidgetID]
, t.[LastTripID]
, t.[LastEventDate]
, t.[ArrivalDate]
, t.[DepartureDate]
)
WHEN MATCHED AND t.ArrivalDate IS NULL THEN
DELETE;
You might have assumed I wrote this 1000+ characters of SQL by hand – but I did not. Next, I’m going to show how you can generate most of this statement based on metadata that lives in your database already. This is only one example of what’s possible!
Setting up a connection to your database in XS Tool Suite is the first step. We can do this on the Settings tab:

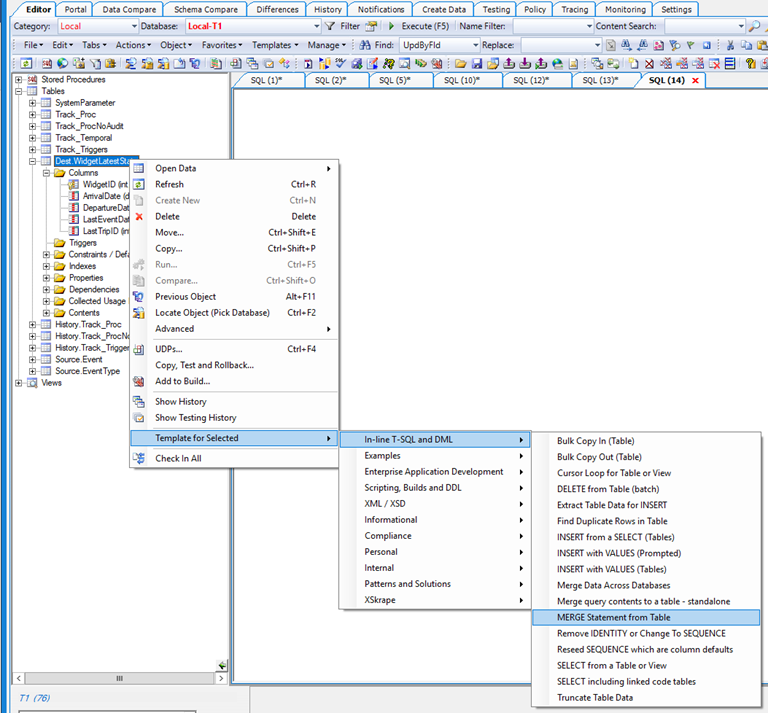
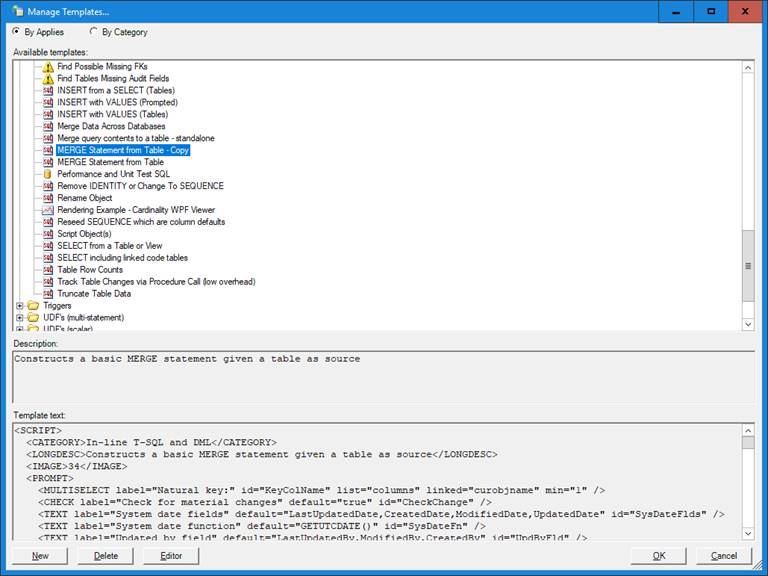
This alias, “Local-T1”, can be used throughout the app whenever you refer to a database. Switching to the Editor tab, let’s find our materialized view table, Dest.WidgetLatestState. Once selected, the context menu gives us the chance to pick a template. Let’s locate “MERGE statement from table” and select it:
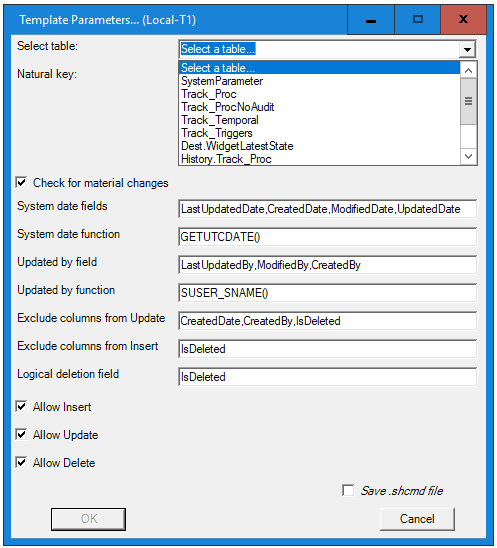
Templates can have parameters that are entered at invocation. This template has several parameters we see here:
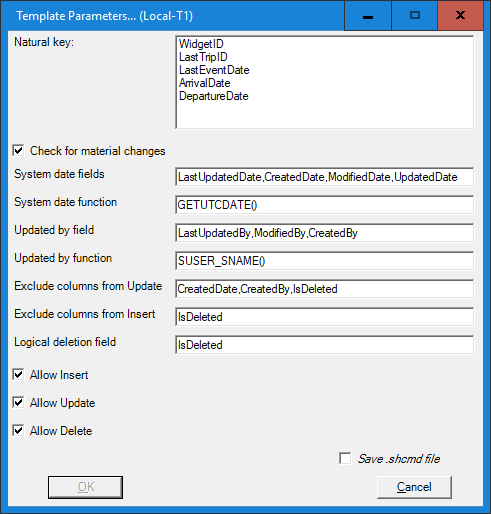
The default values for the text boxes are hard-coded into the template. Want to change them to match your standards? – more on that later.
For this template, the defaults for “system fields” are irrelevant since our target table has none of these fields, and the outcome of running the template will not be affected by the values. The “OK” button is disabled since a required field is missing: the selection of a key that’s used to unique identify rows. In our case here, the WidgetID is a valid key, so after selecting it and hitting OK, we get SQL in an editor window:
-- Note: having a unique index (or PK) on your natural key (WidgetID) is recommended!
MERGE [Dest].[WidgetLatestState] AS a
USING (
-- TODO: Replace with appropriate source query
SELECT
v.[WidgetID]
, v.[LastTripID]
, v.[LastEventDate]
, v.[ArrivalDate]
, v.[DepartureDate]
FROM
[Dest].[WidgetLatestState] v
) AS T
ON
(
a.[WidgetID] = t.[WidgetID]
)
WHEN MATCHED
AND ((a.[LastTripID] <> CONVERT(int, t.[LastTripID]))
OR (a.[LastEventDate] <> CONVERT(datetime, t.[LastEventDate]))
OR (a.[ArrivalDate] <> CONVERT(datetime, t.[ArrivalDate]))
OR (a.[DepartureDate] <> CONVERT(datetime, t.[DepartureDate]) OR (a.[DepartureDate] IS NULL AND t.[DepartureDate] IS NOT NULL) OR (a.[DepartureDate] IS NOT NULL AND t.[DepartureDate] IS NULL))) THEN
UPDATE
SET LastTripID = t.LastTripID
, LastEventDate = t.LastEventDate
, ArrivalDate = t.ArrivalDate
, DepartureDate = t.DepartureDate
WHEN NOT MATCHED BY TARGET THEN
INSERT (
WidgetID
, LastTripID
, LastEventDate
, ArrivalDate
, DepartureDate
) VALUES (
t.[WidgetID]
, t.[LastTripID]
, t.[LastEventDate]
, t.[ArrivalDate]
, t.[DepartureDate]
)
WHEN NOT MATCHED BY SOURCE THEN
DELETE;
This looks very similar to the MERGE statement I presented previously. One change was to address the “TODO”, namely change the source query from using [Dest].[WidgetLatestState] to [Dest].[uv_WidgetLatestState], which is the name of the view that contains our query for this materialized view. Here’s where the convention-based approach of saving your source query in a view that shares a similar name with the target table leads to this very easy change.
Other changes involved adding date filtering to improve performance (@lastprocessed). Since we’re only ever inserting new source events, LastEventDate is guaranteed to be monotonically increasing, and we can filter our source for widgets where there was some type of change since our last refresh. We accommodate the desire to only store cases where we have non-NULL arrival dates, so if an arrival is cancelled, we account for that with the DELETE (the row remains advertised in the source view).
That’s it.
If you’re wondering about the generated code that follows “WHEN MATCHED”: this is because we had “Check for material changes” checked. This checking process is sensitive to the nullability of columns on the underlying table and does its checks in an ANSI_NULLS ON friendly way. To understand why the CONVERT’s are added, consider if your query returns 1.0 / 3.0 as a float, but data storage has this same value as a decimal(6,4). Would your float and decimal be considered equal? No, due to rounding. This in turn defeats the detection of material changes – many cases would look “dirty” when really there’s no change with respect to what’s stored. The CONVERT therefore offers a level of forgiveness, if your source query doesn’t always return result set columns of the same type as what’s stored.
Another tweak you can consider doing, although I do not demonstrate it here: take the “MERGE Statement from Table” template, customize it, and save it under a different name, to support your own standards or needs. For example, your audit field name might be “ChangedBy” instead of “LastUpdatedBy”, so rather than changing it every time in the parameter prompt, your template can retain this as its default. We could also construct a template that creates the stored procedure I alluded to, where the MERGE is surrounded by a CREATE PROCEDURE, maybe a TRY/CATCH, INSERT’s to a log table, etc. How might we do this?
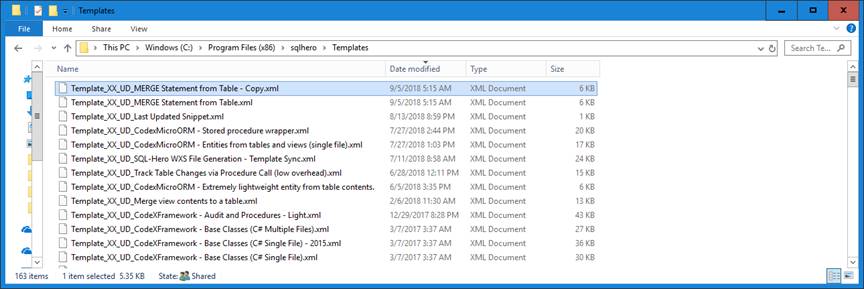
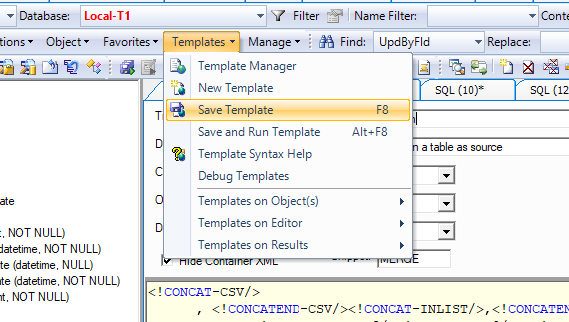
1. Open the “Templates” directory under your SQLHero installation folder; locate the “MERGE Statement from Table” and copy it to a different name – e.g.:
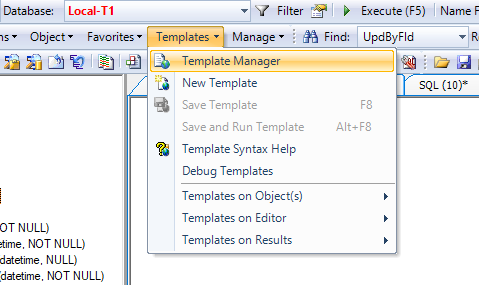
2. Open it using Template Manager:
3. Make changes. I’ll leave this as an exercise for the reader, but I’m willing to offer help through more articles or drop me a line at community@codexframework.com.
4. Save it!
… and use it in the same context as the original: it’s bound to tables. One more thing to mention about templates: you can associate them with a short text moniker, set here:
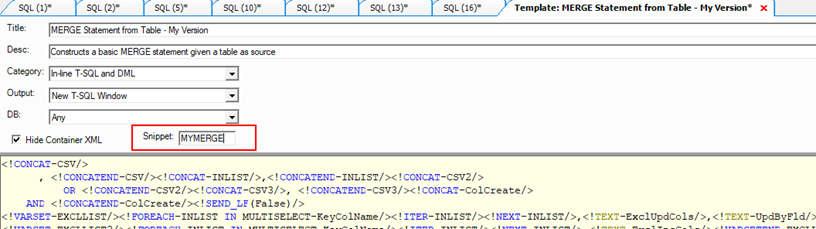
In the example above, if we in an editor window type “mymerge” and hit Tab twice, we’ll see the template parameter screen again:
This looks like the one shown previously, but there is a difference: you’re being asked to select a table, since in the previous case, we had one already selected in the object tree. The template engine understands context and can ask for it when needed.
What if you want to enhance your materialized view with say a new column? One of the beauties of the process is it reduces to the following steps:
1. Add the column to the target.
2. Update the view to return data for the new column.
3. Re-generate your MERGE, either from the standard template or a custom template of your own; whether you need to do any further customization depends on your approach (i.e. control date vs. no control date) and with a custom template, you can include all the nuances you like (e.g. “uv_” as your standard view prefix so no need to even change that in the generated code).
As we’ve seen, templatizing lets you focus on writing core business logic instead of boilerplate code. This entire example should serve as a call to action to think about other scenarios that can be templatized. Either tell us about them (e.g. comments below!), or soon we’ll have a release of XS Tool Suite that lets you share your own templates. The advantage here is in crowd-sourcing ideas that can solve common problems. Saving 99% of your typing means you have more time to research cool new things, so… be creative and enjoy! 😉
P.S., have you signed up to receive notifications when new articles are published? Do so here.
Did you like this article? Please rate it!